adionSoft Fast Image Resizer Documentation
Basics
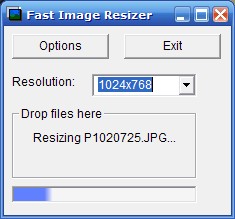
Resizing your images using Fast Image Resizer is very easy.
First, start Fast Image Resizer, either with the shortcut in your Programs menu,
or with the shortcut on your desktop.
Next, select the preferred resolution in the Resolution drop-down box.
Finally, use windows explorer to browse to the images you want to resize, and
drag and drop them into the drop box on the Fast Image Resizer window.
Fast Image Resizer will now start resizing your pictures to the selected resolution.
Resolutions
If you need a resolution that is not listed in the drop-down box, it is also possible
to add your own resolutions.
If you just need one extra resolution, you can simply type it in the resolution drop down.
If you want to change the default resolutions listed in the drop down box, you can do so by
scrolling to the bottom of the list and selecting 'Edit List'.
From there you can add or remove entries from the list.
It is also possible to select a percentage instead of an absolute resolution. If you enter 50% for example, the image will be resized to
50% of it's original size.
You can also enter 'No Resize' which is actually similar to 100% if you only want to use fast image resizer to rotate your pictures or change
the compression quality or format.
Cropping
Fast Image Resizer always preserves the aspect ratio of your pictures, which means they
will not be stretched to match the resolution you selected.
This means that sometimes the resized image will not have exactly the resolution you selected.
If the image you want to resize is very wide (1000x500 for example) and you selected to resize it to
640x480, then Fast Image Resizer will select a resolution that just fits in the selected resolution.
In this case, the resized image would get the resolution 640x320.
If you want the pictures to have exactly the resolution you selected, you can enable the option 'Automatic Cropping'.
This option will cut out a piece in the center of the original picture. In the example this would mean that the resized
picture will have a resolution of 640x480, but that on the left and right side, some part of the original picture has been cut off.
Rotation
Fast Image Resizer has 2 options to rotate the images before resizing them.
The first is to rotate them to landscape always. This is especially useful for viewing on mobile devices such as cell phones
or PSP (Playstation Portable) where you want to use all screen size that is available as good as possible.
The second option is to rotate the pictures using the information in the EXIF data. Some digital cameras store
this information in the pictures you make, and add information about the camera position at the time the photo was taken.
Fast Image Resizer can use this information to rotate pictures that are on their side to the correct orientation.
Other options
JPEG Quality is the quality of the saved jpeg files. The higher this value,
the better the quality, but the larger the files will be. Values higher than 95 will
only make the files larger, without a visual improvement. 90 is usually enough for high
quality pictures.
If file size is important, you can use lower values. Below 60 the quality will probably be unacceptably low though.
Resize Quality is the quality of the resize algorithm used. 'Good' will give good results and works quite fast, but creates slightly softer pictures. 'Excellent' is the recommended setting which is a bit slower, but gives you sharp results. 'Best' is usually not recommended, because it will take a lot longer than 'Excellent' and the difference is only very small.
JPEG, BMP or PNG is the compression algorithm used. JPEG is the most popular and used on the web.
It will create the smallest files, but can degrade image quality.
BMP is an uncompressed format, which takes more disk space, but is useful if you want to edit the images after resizing them.
PNG is a compressed format that is also supported by web-browsers but does not lose any quality. The file size will be smaller than bmp, but usually larger than jpg.
Destination allows you to select where the resized images will be stored. They can either be stored in the same
folder as the original pictures (but with a different name), in a sub-folder in the folder of the original pictures
or in a specific folder.
To specify the destination folder, you can enter a name, which may contain the special strings %WIDTH% and %HEIGHT% which will
be replaced with the selected width and height.
If you selected a specific destination folder, you can also use %SUBDIR% in the name to create a subdir with the same name as
the subdir the files you wanted to resize are in.
For example, you have a file c:\pictures\vacation 2007\picture1.jpg and you have entered
d:\%SUBDIR% as the destination folder. In this case, the resized picture will be stored in
d:\vacation 2007\picture1_640x480.jpg
Output Filename is the filename of the resized picture. Special strings that you can use are %SRC% which will
be replaced with the original filename, %DSTX% which will be replaced with the final width of the picture, and %DSTY% which
will be replaced with the final height.
You can also use %N%, %N2% up to %N6% in the filename. This will create a unique number for the resized picture.
The number after the N specifies the minimum size of the number. For %N2%, the numbering will start with 01, 02, 03, ...
%N3% will create numbers like 001, 002, 003, ...
Copy EXIF data from source: Most digital cameras store additional information in the picture such as the date it was taken
as well as other technical information (flash, exposure time, camera brand and model, etc.)
When this option is enabled this information will be copied so that it is still available in the resized version of the image.
Always on top will cause the main window to be always on top of other windows, so that it is easy to drop files on it.
Portable Application
If you want to put Fast Image Resizer on an USB Stick or CD to use on other computers without having to install it,
that is possible too.
First install Fast Image Resizer on your computer, then copy the folder C:\Program Files\FastImageResizer to your USB stick or CD.
You can now start fast image resizer without installation on any computer by just starting FastImageResizer.exe